
Getting Started with MPLAB IDE
 PIC10/12/16 MCUs is the compiler use to compile the code for PIC 10,12 and 16 family. In this tutorial, we are going to use MPLAB with HI-TECH C compiler to compile and upload to PIC16F877A(if you are using PIC16F887, just choose PIC16F887 instead of PIC16F877A whenever required).MPLAB supports Windows, MAC OS and LINUX. Here, we presume that you are using Windows. Download the MPLAB IDE from download page.
We have also created 3 videos to show you how to create project and program PIC16F, PIC18F and PIC30F using MPLAB IDE.
MPLAB IDE & HITECH C PRO Installation
Please install MPLAB IDE and HI-TECH PICC Lite according to the following steps.
- Double click on the Setup to install MPLAB (this version is V8.70).
- The Install Shield Wizard will pop out.

- After all the directions shown in the welcome note (as in following diagram) is done, please click Next> for next step.
- Select I accept the terms of the license agreement if it is not selected in the diagram below, and click Next> after this.
- Select Complete for the setup type to install all program features, and click Next> to next step.
")
- In the Choose Destination Location, user is recommended to use the default destination folder, which is C:\Program Files\Microchip\ or user is also free to select the other destination folder by using the Browse… button to browse to the desired destination folder. After that, click Next> for next step.
")
- Select I accept the terms of the license agreement if it is not selected in the diagram below, and click Next> after this.
- Select I accept the terms of the license agreement again for the window shown below, and click Next> after this.
- A window for Question will pop out, click YES to proceed with installation of HI-TECH C.
")
- Click Next to Install HI-TECH C.
- Select I accept the terms of the license agreement if it is not selected in the diagram below, and click Next to Install HI-TECH C.
- Click Next> to proceed.
")
- Select Add to environment path if it is not selected in the diagram below, and click Next to proceed.
")
- Wait for the installation process to be completed.
- Click Finish after successfully installed the HI-TECH C.
- The installation of MPLAB V8.70a is completed. Click Finish to exit. User may need to restart the computer just after the installation or restart later.
CREATE PROJECT
We will be using the sample code of DIY project – PR5 for this example. You can download it here.
- Go to Project on the toolbar ► Project Wizard…
- When a windows appear, click Next.
- Choose the type of device that you want to use and click Next. (choose PIC16F877A for this case because the sample code is using PIC16F877A)
- Choose HI-TECH Universal Toolsuite in Active Toolsuite. HI-TECH ANSI C Compiler will show up in the Toolsuite Content.

- Choose a destination where the project you create can be saved and type the project name. After that, click NEXT>.
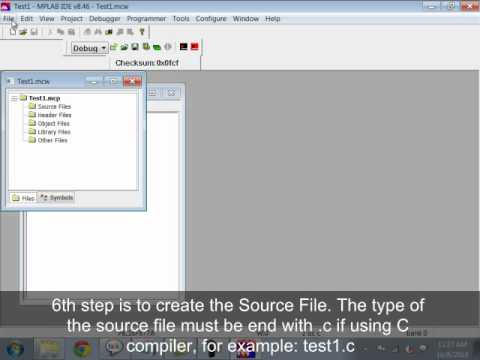
- Add the existing file(source file, header file) to the project by selecting the directory folder where the files are located and add to the project created. For source file, it will be *.c file while header file will be *.h file.

- Click Finish.
- Or you can manually add the source file and header file after you created the project by Right clicking on the Source Files or Header File ► File directory ► Select the File (*PR5.c for this example) ► click Select
- Or if you have an existing project (for some Cytron’s tutorials, the project is given), you can open the project from Project ► Open ► File directory ► Select the File (*.mcp ) ► click Open
EDIT, COMPILE AND LOAD
- To view the project that you have created or opened, click ► Project ► View project. Your project bar should appear.
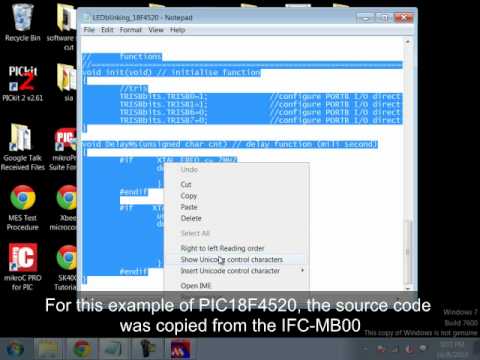
- To edit your source code, double click on the *.c file(PR5.c) under Source Files

- After you have edited your code, you are ready to compile and load it to your device.
- Right click on the project title(PR 5.mcp) ► choose Build.

- In order to load the file to the device, connect the programmer(UIC00A/UIC00B) to the computer and the device.
- You can choose to load from MPLAB or using PICkit 2 Programmer software
LOAD FROM MPLAB
- Go to Programmer ► Select Programmer ► Choose Pickit 2

- Again, go to Programmer> Setting.
- Tick the box as below.

- Right click on the project title(PR 5.mcp) ► choose Build.
- That’s it.
LOAD FROM PICKIT 2 PROGRAMMER SOFTWARE
- Download and install PICkit 2 Programmer software.
- Open the software
- Go to Tools ► Check Communication
- Go to File ► Import Hex ►

- Go to the project folder that you created ► Choose the *.hex file

- Click Write

- That’s it. You can repeat to edit, compile and load until you have achieve the result you want.
How to create a PIC16F project and program it using MPLAB IDE
How to create a PIC18F project and program it using MPLAB IDE
How to create a dsPIC30F project and program it using MPLAB IDE

Related Posts:


![]() Published by: cl.chin
Published by: cl.chin
hai…..
bagaimana saya nk dapatkan library untuk pic16f876A kerana dalam software MPLAB saya tiada library 2……prgram saya berkaitan dengan pic16f876A lah…tq
I think you did not install HI-TECH C Compiler correctly or you did not setup the project properly. Please do continue the discussion in our technical forum where you can paste printscreen of your MPLAB IDE and we can further point out the problem.
Hi, i try to load the Project Hello Word to the SK40C, however when i try to build the coding, its failed to build? why that happen? tq
Ameen,
Please continue discuss/post at our technical forum.
There are more members to share ideas and suggestion.